Can-Do Chicken
By Stacy Schultz | Photos by Carmen Troesser // May 15, 2011
Growing up in my house, burnt was best. If the meat’s skin was missing that crispy, crackling char, it needed to sit a bit longer over hot coals or tan some more under the broiler’s flames. Pink was the enemy here, and we would go to the ends of the earth to eliminate it – no woodchips would be spared. We always blamed this darker-is-better way of carnivorous eating on my mother and her Memphis upbringing – after all, in a town where barbecue is king, it’s easy to take on well-done as a philosophy to live by.
So by the time I made my way down South for college, it’s safe to say that I was pretty stuck in my poultry-polluting ways. I had baked and broiled until my oven was utterly exhausted, sautéed and deep-fried with the oil burns to prove it, basted – and re-basted – for hours on end, all with the same result: If the meat was tender, the skin lacked crispness; if the skin had that perfect bronze hue, the meat was drier than Arizona in August. I was
this close to giving up – that is, until I had beer-can chicken.
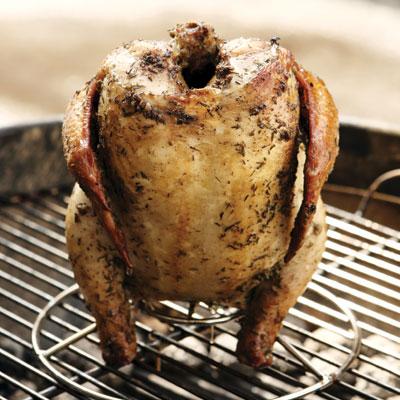
The concept was as old as it was simple: Set a whole chicken atop an open can of beer, and then put the entire bird – can and all – on a grill for about an hour or so over toasty coals while you enjoy a cold one, or three. The fire crisped the chicken’s skin and the brew acted as a vertical steamer, infusing the bird with all its boozy deliciousness and creating meat that’s tender, moist and drunk with juiciness. Genius? OK, maybe not. But successful? You betcha.
The technique is pretty straightforward, but as with any method of cooking, there are a few key points to keep in mind. First and foremost, let your inner Bobby Flay take a step back. Usually, I’m all for the DIY blood, sweat and butter way of cooking, but don’t be afraid to get a little help on this one. A simple stand will set you back just a few bucks, and forgoing it could result in a bird that resembles a drunken chicken passed out on the grill after a late night rather than one that stands proudly atop it (chest out, shoulders forward, just like mom taught us).
The next thing to remember is the importance of indirect heat. In order to master that crisp-on-the-outside, moist-on-the-inside nirvana, it’s essential that you not cook the chicken too quickly. Making a piping hot fire and setting the chicken right on top of the coals would do just that, so instead, once the coals are hot, push them to the sides of the grill, forming a crater in the middle where there are little to no coals under the chicken. If you’re using a gas grill or can’t do this for some reason, just be sure to turn the chicken every 15 minutes or so. (Actually, it’s a good idea to check the chicken every 15 minutes anyway to make sure the fire isn’t too hot, that you don’t need to toss in additional woodchips and that Chicken Little is still standing.) Once the thickest part of the thigh reaches 160 degrees, it’s done.
As I pulled my first beer-can chicken off the grill ever so carefully back home, I caught my mom eyeing it from the other side of the room. The skin was bronzed and crisp, gritty with seasoning and studded with flecks of smoky char, just the way she liked it. But what would the meat taste like? Was there any chance this simple technique had enabled me to finally achieve the poultry paradise I had been striving for? The answer was clear with the first bite: “The meat – the meat!” my mom exclaimed as she tore off another piece. “It’s so juicy, so tender, so … and the skin, it’s so crisp, so perfect. This is how chicken should be,” she claimed between bites. Now that was a life lesson I could get behind.
Once you’ve mastered the method, the fun starts. Beer-can chicken takes on any flavors you introduce it to, from the beer that steams the bird to the dry rub you spread across its skin. Whether you prefer spicy, sweet or subtly simple, take a cue from these local chefs and craft-beer connoisseurs to infuse a spectrum of scrumptious flavor into your next backyard barbecue.
For hoppy beer + black garlic click
here.
For malty beer + cajun rub click
here.
For lager + sweet and spicy rub click
here.
For wheat ale + fennel garlic rub click
here.
Shakin' things up
As with so many tried-and-true recipes, you can bet that creative home cooks have twisted and tweaked beer-can chicken in every way imaginable. Here, a few ways to experiment in your own backyard.
For a more flavorful bird,
brine the chicken in a liquid that incorporates salt, water and a can or two of the beer you’re using, along with some of the flavor agents in your dry rub, for 24 hours.
Add a bit of
cornstarch to your dry rub for an outer skin that’s so crunchy, so crispy, you’ll think the bird took a dip in the deep fryer.
Has rain ruined your grilling plans? Don’t worry – beer-can chicken can easily be made in the oven. Just place the stand inside a roasting pan and make sure your
oven rack is in the lowest position possible. Roast for 1 hour and 15 minutes to 1½ hours at 350 degrees.
Another easy way to play with this recipe is to
switch up the liquid you use. You can pour just about anything into the open can you nestle inside the chicken’s cavity, from wine to chicken broth to your favorite soda; just be sure to use a dry rub that pairs well with its flavor.
Just as you would with a roasted chicken, you can always add some of the ingredients in your dry rub into the
cavity of the chicken to enhance the flavor of your bird. Try cut fruit, whole peeled garlic cloves, vegetables and fresh herbs.